Sale Ends Today! 75% off our annual membership. Get skills that fulfill.

 Rhea
Rhea
Learning a new illustration program can be daunting, and there are often loads of different functionalities that get overlooked. Procreate, one of the most popular current illustration applications is jam-packed with awesome features. If you are looking to learn all about this program, Erika Wiseman’s amazing course, ‘Digital Drawing in Procreate for Beginners’ might be just what you need!
To make sure you don’t miss out on any of Procreate’s useful functionalities, we have compiled a list of our favorite Procreate tricks that you may not know about!
Have you ever wondered how to draw precise shapes and lines in Procreate? Well, the good news is, Procreate has a super intuitive feature just for this! Want a perfectly straight line? All you have to do is to freehand draw your line and then hold down your pen for a moment at the end of the gesture until it straightens out. This trick works perfectly for shapes as well, so you never have to worry about trying to create the perfect freehand circle ever again!
Many beginners to Procreate often don’t realize that you can simply drag a color from your palette to fill in a section of your illustration. All you have to do is select your desired color on the Color Wheel and then drag it down onto wherever you wish to fill. This trick is great as it allows you to quickly test out different colors in your illustrations!
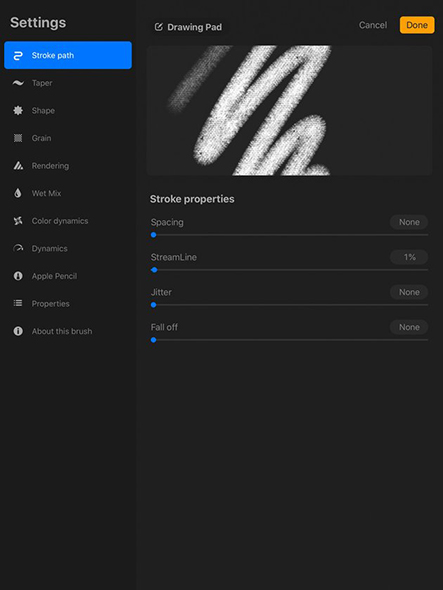
Have you ever been using a default Procreate brush, and thought that with a few tweaks it would be perfect? Well luckily, with a few simple steps, you will be able to edit or create any brushes you want!
To edit an existing brush, simply swipe left on it in the Brush menu and select ‘Duplicate’. Once you have duplicated your chosen brush, simply double-tap on it to open its settings. There are so many different aspects of the brush you can play with including, Shape, Stroke-path, Taper, Stabilisation, Grain, Mixing, and Colour dynamics! With so much customization available, you are sure to be able to create the brush you are looking for! Looking to create a brush from scratch? Simply press the little plus icon at the top of the Brush menu and get creating!
If you want to dig deeper into custom brushes check our detailed guide on how to create custom Procreate brushes.
The Liquify tool is one that often gets overlooked in Procreate, even though it has many awesome uses! The tool can be easily accessed via the Adjustments drop-down menu in the top left-hand corner. Once it is selected, you will be able to adjust or warp parts of your illustration simply by dragging them with your pen. This tool is great if you need to make any minor edits to your illustration, such as slightly changing the shape of an eye or moving the corner of a character’s mouth. Liquify can also be used to create some really cool abstract effects in your work!
Did these tips inspire you to try out creating in Procreate? Still not sure where to start?
Why not give ‘Digital Drawing in Procreate for Beginners’ course a go and learn even more amazing tips and tricks!!
Rhea
Rhea is an Australian concept artist who is currently studying at Griffith University. She is passionate about spreading her love of art to others.


 Gift Cards