 Ryan
Ryan
The Loomis Method is a drawing technique that uses grids to represent the human head from various angles accurately. This technique was developed by the American Illustrator Andrew Loomis in the 1940s.
The Loomis method consists of two main steps: constructing a geometric grid and placing facial features within it.
This method is excellent for beginners just starting with drawing faces as it gives them a sense of accuracy and structure. If you are a beginner who wants to improve your drawing skills, check out our course “Fundamentals of Drawing“.
However, experienced artists may find this method inflexible.
Despite this, the Loomis Method is still useful for understanding various face elements’ relationships. Artists can also tweak the grid to create different proportions and experiment with facial features.
This article will discuss the basics of the Loomis Method and how to use it when drawing a human face. By the end, you’ll better understand this method and be able to create striking portraits. So let’s get started.
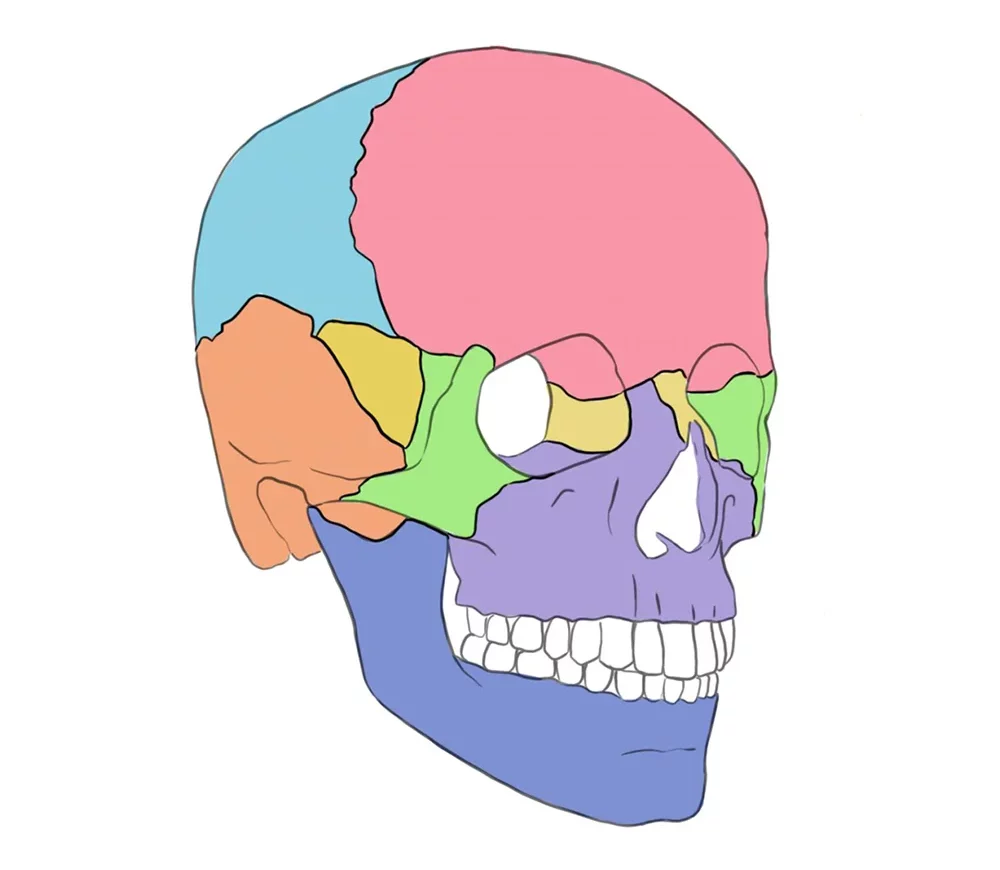
Before we dive into the Loomis Method, let’s first understand the anatomy of a human skull.
The skull is made up of six prominent plaques: the frontal bone, parietal bone, zygomatic bone, nasal bone, maxilla bone, occipital bone, and mandible.
Before moving on to head construction, we should remember that the head is not perfectly round. Understanding this is crucial for creating life-like drawings.
Understanding human anatomy makes you a better artist. Check out our course “Figure Drawing for Beginners” to learn how to draw human figures like a pro.
Now that we understand the face and head anatomy basics, let’s move on to how to use the Loomis Method. It starts with drawing the grid to get accurate proportions of the face.
Here is the step-by-step process for drawing the head from the front:

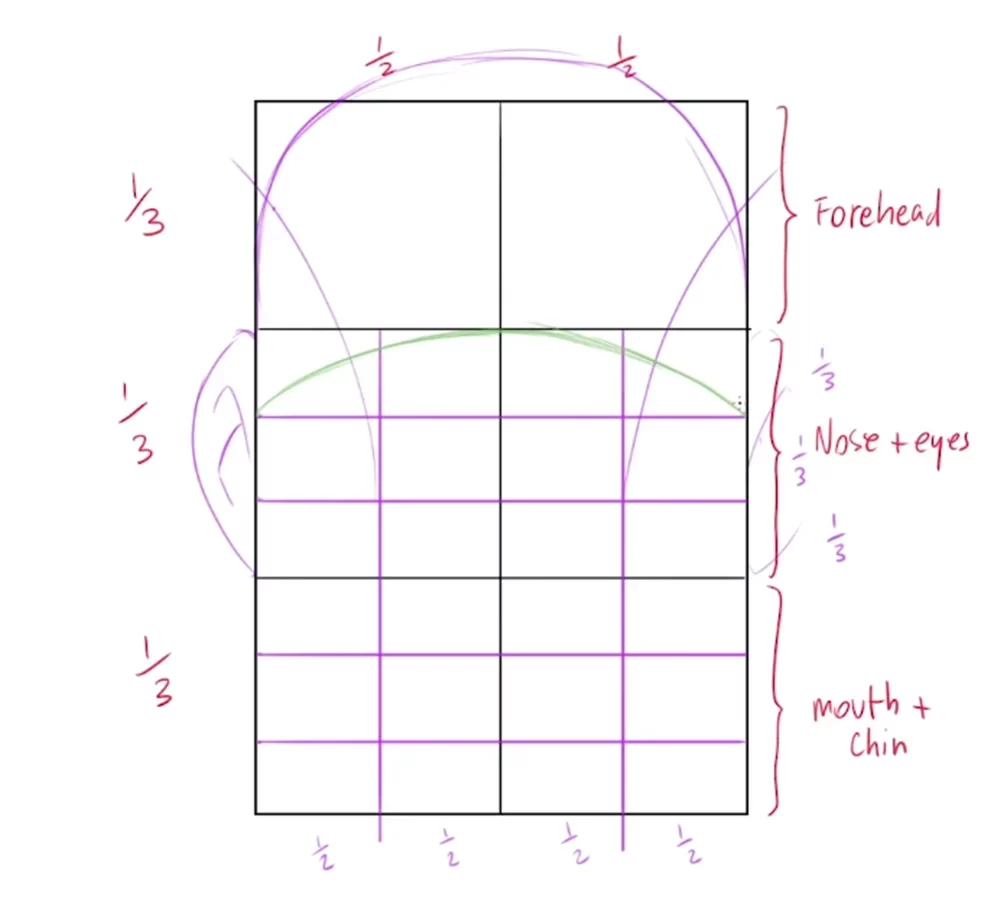
Start by drawing a rectangle that will be the boundary of the grid. This rectangle will hold the shape of the face.
The size of the rectangle can vary depending on the size and shape of your subject’s face. However, to create a standardized face, make the length of the rectangle about one and a half times taller than the width.
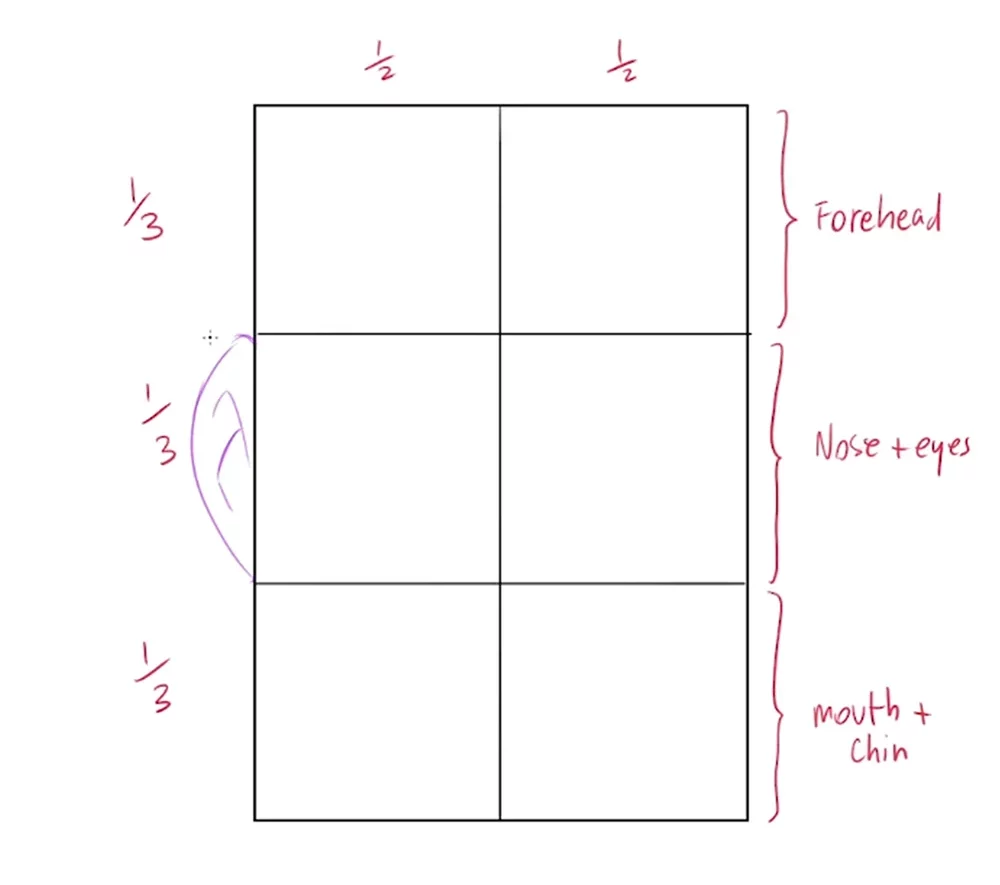
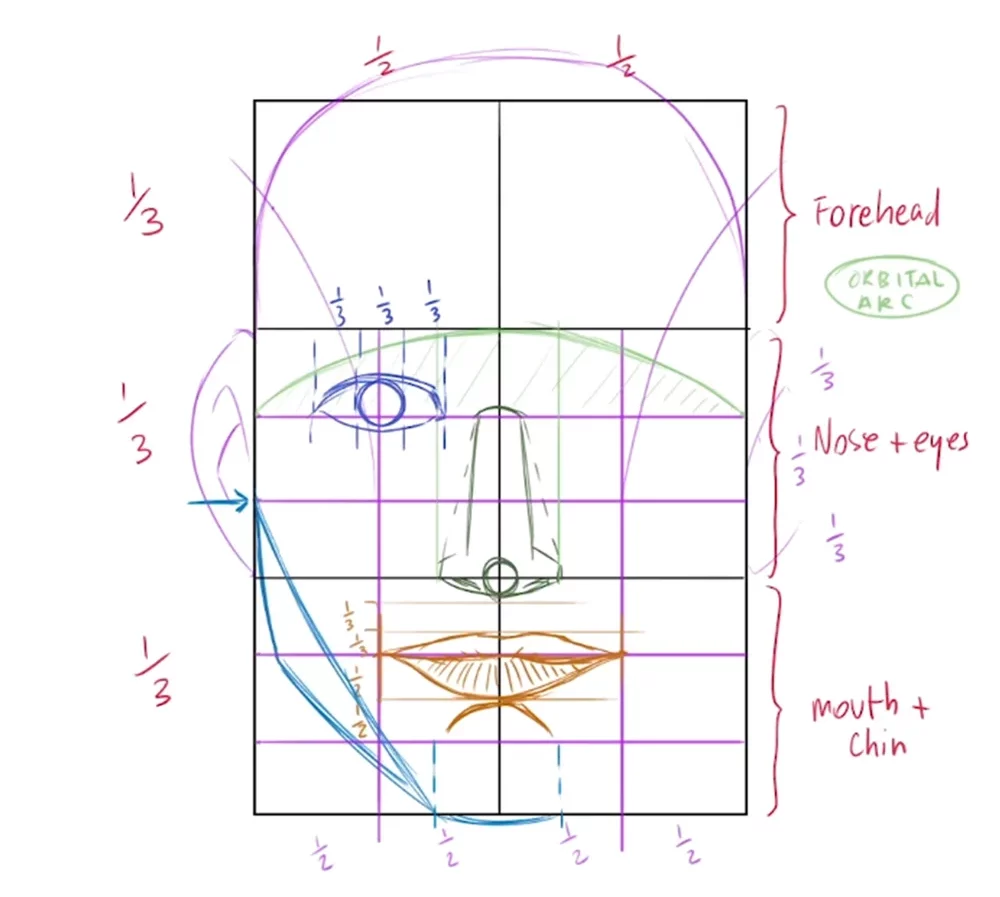
After drawing the rectangle, divide it lengthwise into two parts by drawing a vertical line in the middle. It will be the axis of the face. Then draw two horizontal lines at equal distances dividing the rectangle roughly into six small squares.
The top section is for the forehead, the middle section is for the eyes and nose, and the last section is for the mouth and chin. The ears will be placed in the middle section but outside the grid.
This grid will help place facial features and ensure that all the proportions are correct.

Now draw a vertical line at the centre of both the squares in the middle and lower section, dividing them lengthwise into two parts. Then divide those squares further by drawing three horizontal lines at equal distances in each of them.
This will make each original square into six smaller rectangles. These small rectangles will help you position the facial features accurately and create a realistic head.
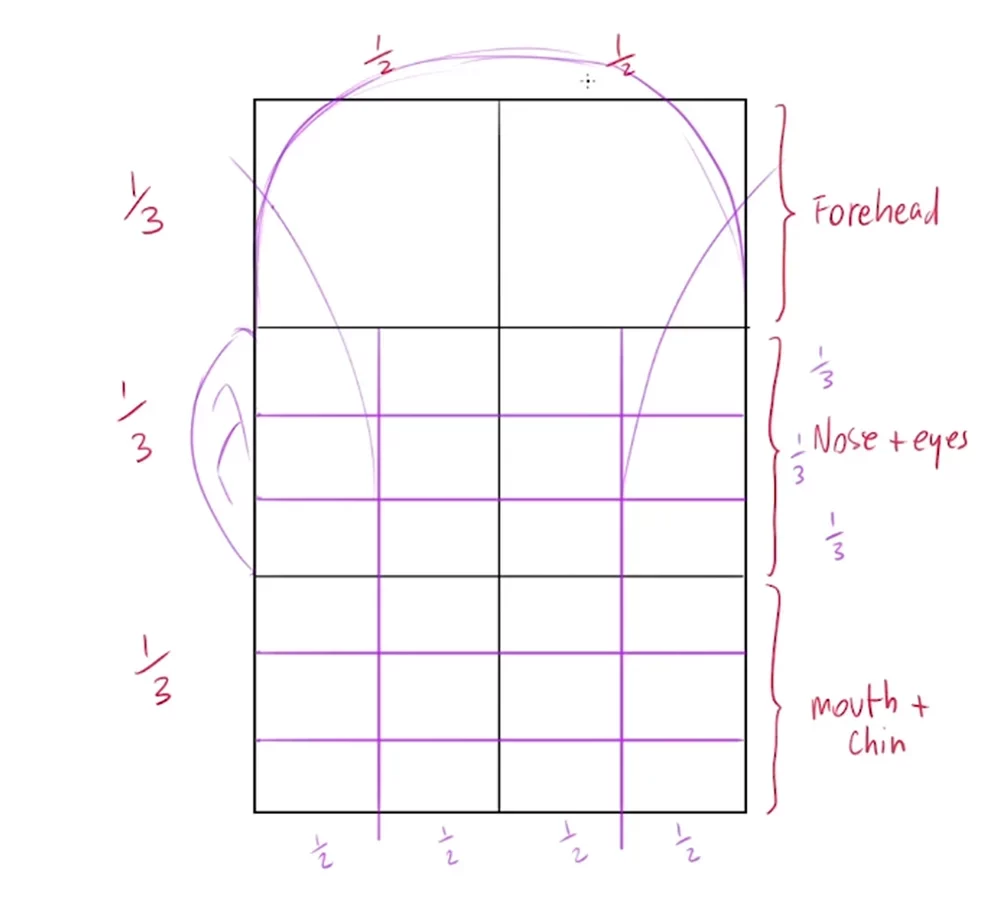
Trace an arch from the middle line of each mid-square to the middle outer side of the top squares. This will roughly outline the temporal muscle.
Then draw another arc, starting from the bottom-left corner of the top-left square to the middle-top side of the same square. Do the same with the top-right square, as shown in the picture above.
Finally, connect the two arcs outside the grid to create the outline of the top of the head.
After drawing the head shape, move on to draw the brow line.
For drawing the eyebrow line, draw an arc in the middle section. This arch will start from the lower-left corner of the top rectangle of the mid-section to the top of the middle line, which divides the face into two parts.
The arch will then turn downwards to the lower-right corner of the top rectangle of the right square of the middle section. This will highlight the protruding brow line.
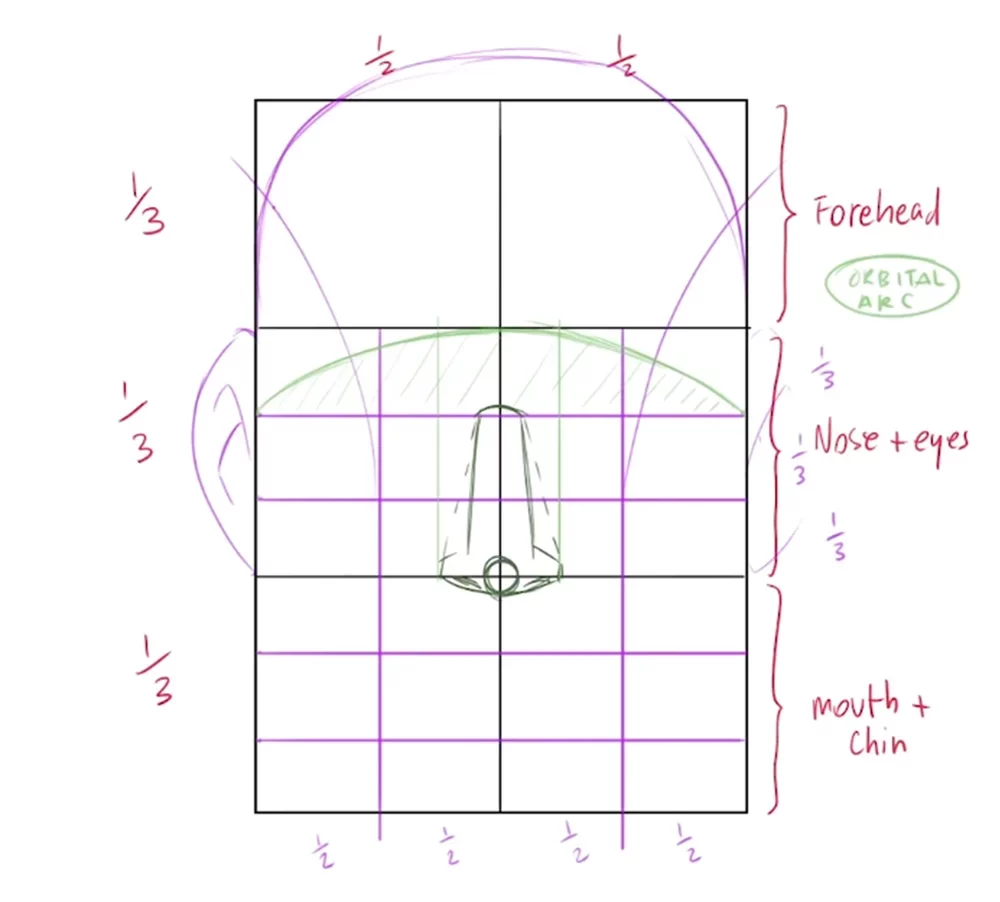
After establishing the brow line, it’s time to locate the nose.
Draw two vertical lines dividing the inner rectangles of the middle section in half. These lines define the boundaries of the nose.
The point where the top horizontal line dividing the squares of the mid-section intersects the axis line will be the top of the nose.
The horizontal line dividing the mid- and bottom sections will be the bottom of the nose. You can draw a small circle to define the tip of the nose. This circle should be placed precisely at the intersection of the mid and the bottom sections with the center line.
With this measurement, you can draw the boundaries of the nose, as shown in the figure above.
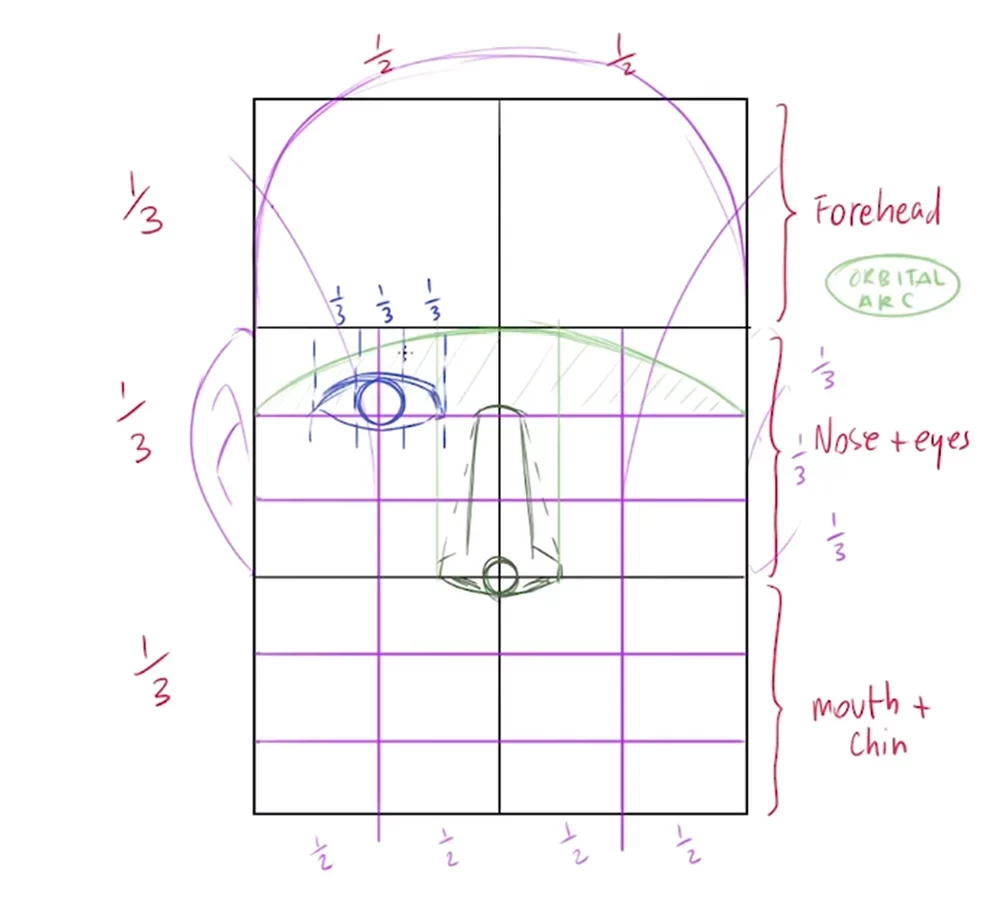
To locate the eyes, start by drawing a circle roughly at the intersection of the first horizontal line and the vertical line in the left square of the middle section. This is going to be the iris of the eye.
The width of the eye is three times the iris. Therefore, using it as your measurement, draw two lines to the sides of it as the other two-thirds.
Now draw two arcs—one above the circle and the other one below. Both the arcs will end where you have marked the outer lines of the eye. Remember, the top arc will be more curved than the bottom one. Follow the same steps on the right side to locate the right eye.
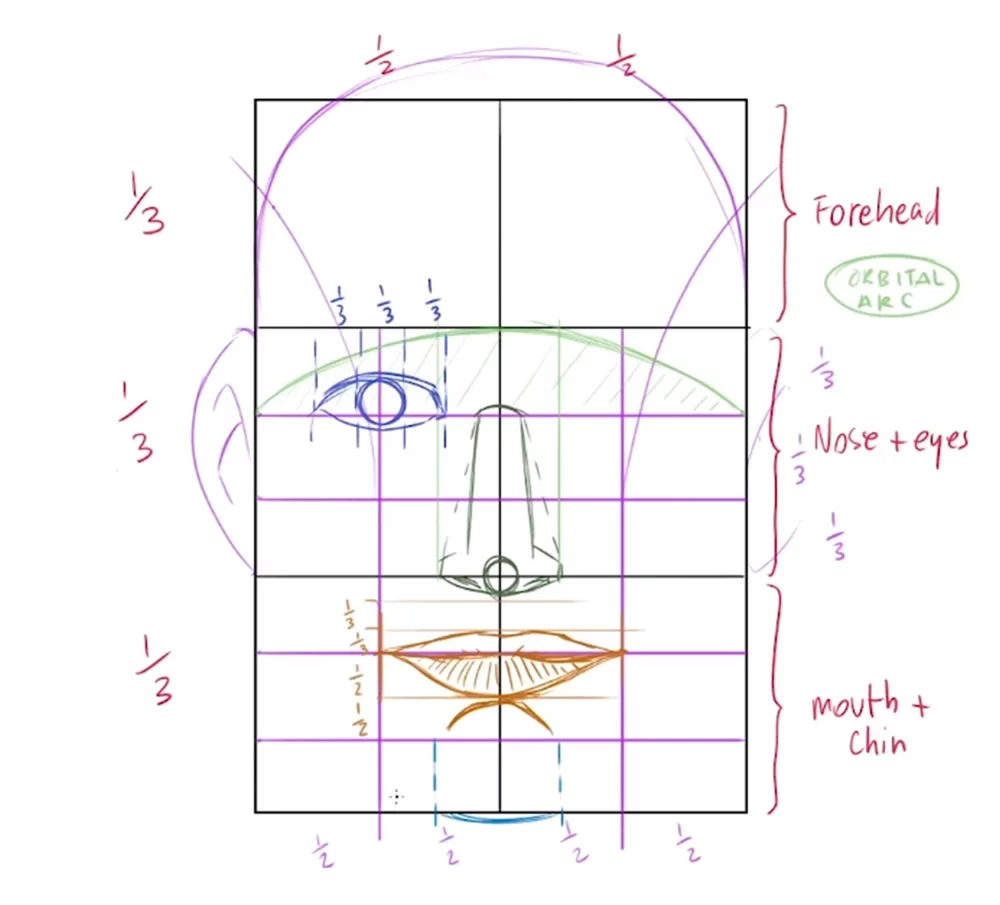
Now let’s move to the bottom section and focus on the mouth.
Highlight the central, vertical lines of the squares of the bottom section and the part of the first horizontal line dividing those squares between those vertical lines.
Now divide the middle top two rectangles of the bottom section horizontally into three parts. Similarly, divide the middle two rectangles of the bottom section horizontally into two parts.
Now that we have our grid ready, we can draw the mouth and chin. The top lip will be drawn in the bottom section of the first rectangle, and the bottom lip will occupy the top half of the middle rectangle.
The chin will be placed in the bottom half of the central middle rectangles of the lower section.
After drawing the mouth and chin, it’s time to locate the jawline. To do this, trace two vertical lines in the inner lower rectangles of the bottom section. These lines will determine the boundary of the chin, which will slightly stick out of the grid.
From the external end of the chin, trace a slightly curved line towards the top corner of the bottom rectangle of the middle section. This outlines the lower part of the cheekbones.
Go back to the same end of the chin and trace another line aiming for the bottom side of the top rectangle in the lower section. From there, turn upwards towards the same point where the cheekbone ends. Now you have outlined the jaw.
We have already seen how to draw the front view of a face using the Loomis method. Now let’s see how to draw from the side profile.

Start by drawing a rectangle slightly wider than the one used for the front view. This time, it needs to be wider because it’ll contain the sphere, including the back of the head.
This rectangle will be the boundary of the grid.

Draw a vertical line dividing the rectangle vertically into two equal parts.
Now draw two horizontal lines at the same distance dividing the rectangle into six small rectangles, as shown in the image. This grid will help you draw the facial features accurately.
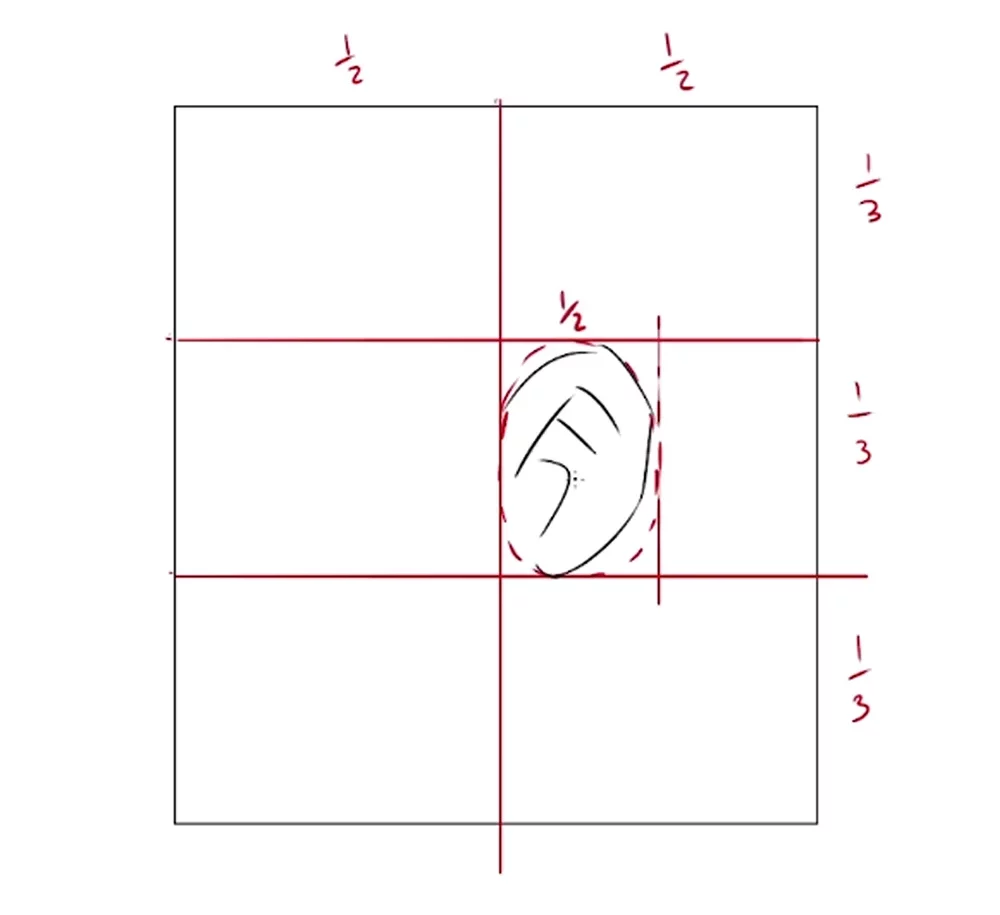
Divide the right rectangle of the middle section vertically into two parts. Now, make an oval in the inner half of the central section. This is where the ear is to be located.
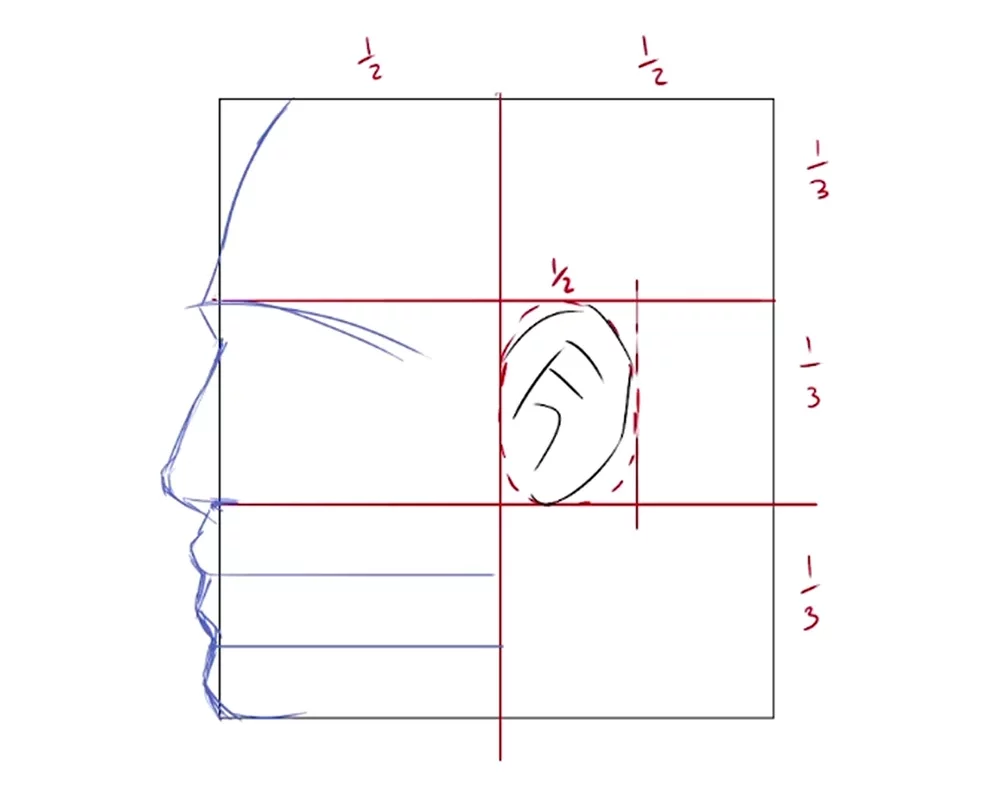
After locating the ear, outline the forehead, eyes, nose, and mouth sticking out from one side of the grid, as shown in the image above.
You can follow the same proportions roughly from the front grid to get an idea of the outline.
Draw two horizontal lines in the left rectangle of the lower section, dividing it into three parts. Then draw a vertical line in the middle of the same rectangle. Now the left rectangle of the lower section is divided into six parts.
Within the lower left rectangle trace, an arc from the bottom left corner of the right rectangle to the upper right corner of the same rectangle. This is the jaw seen from the side. From there, draw an upper stroke towards the bottom of the ear.
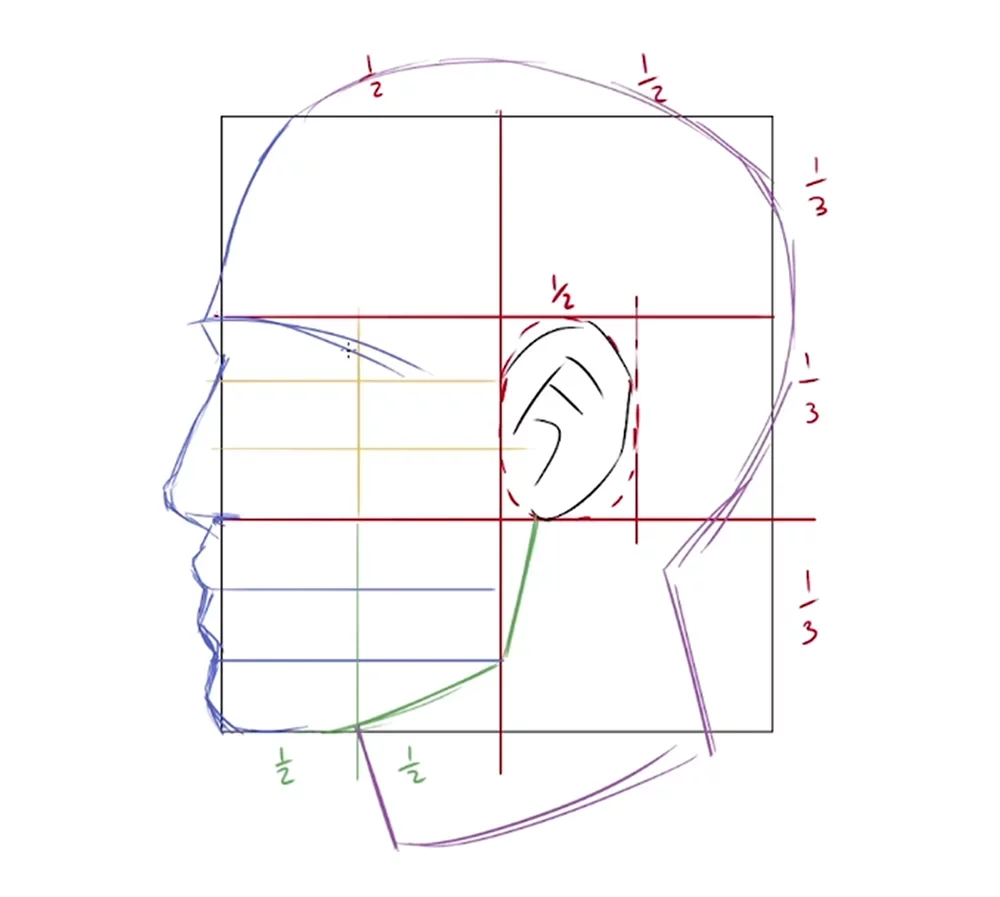
For drawing the skull, trace an arc from the forehead toward the right side of the grid. When you reach downwards to complete the circle, stop just after the start of the lower right rectangle. That’s where the skull connects with the neck.
The resultant figure should look like the image above.
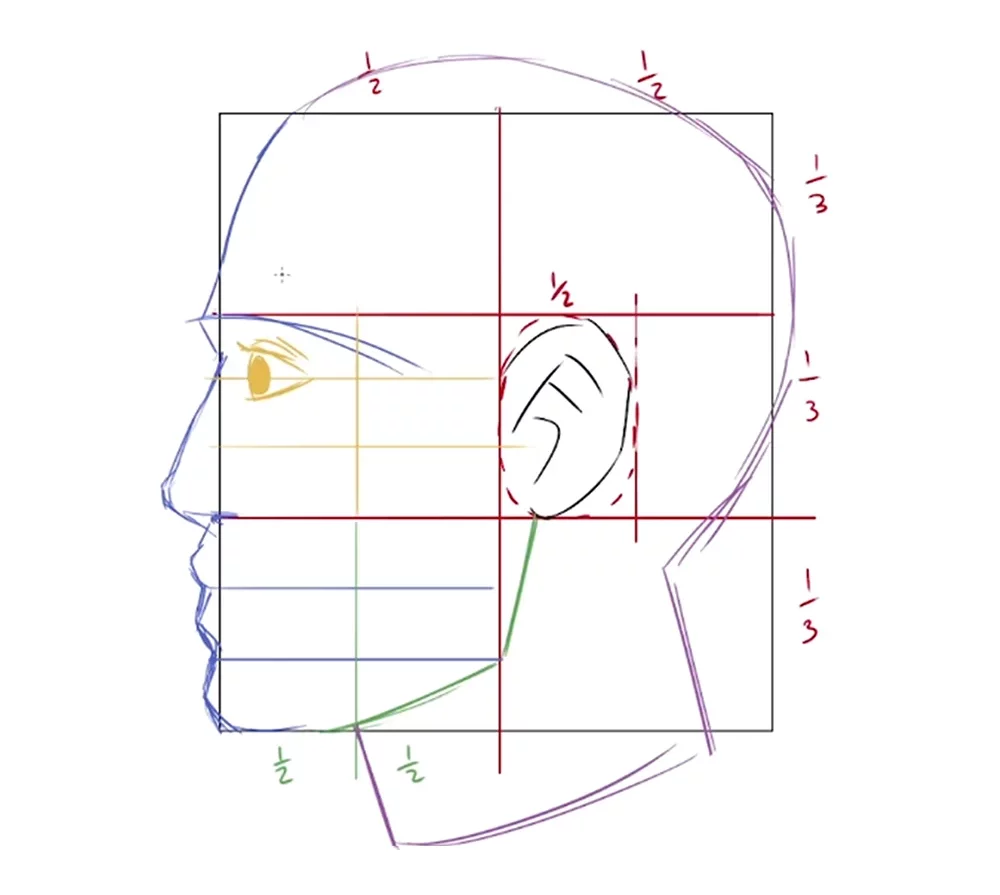
Now that we have the frame of the whole head, it’s time to locate the eyes.
To do that, divide the middle section’s right rectangle lengthwise by drawing a vertical line in the center. Then draw two horizontal lines dividing the rectangle into six parts in the same way as the bottom section.
Draw the iris on the top of the first horizontal line towards the left border of the same rectangle. Then, draw two arcs around the iris to complete the eye.
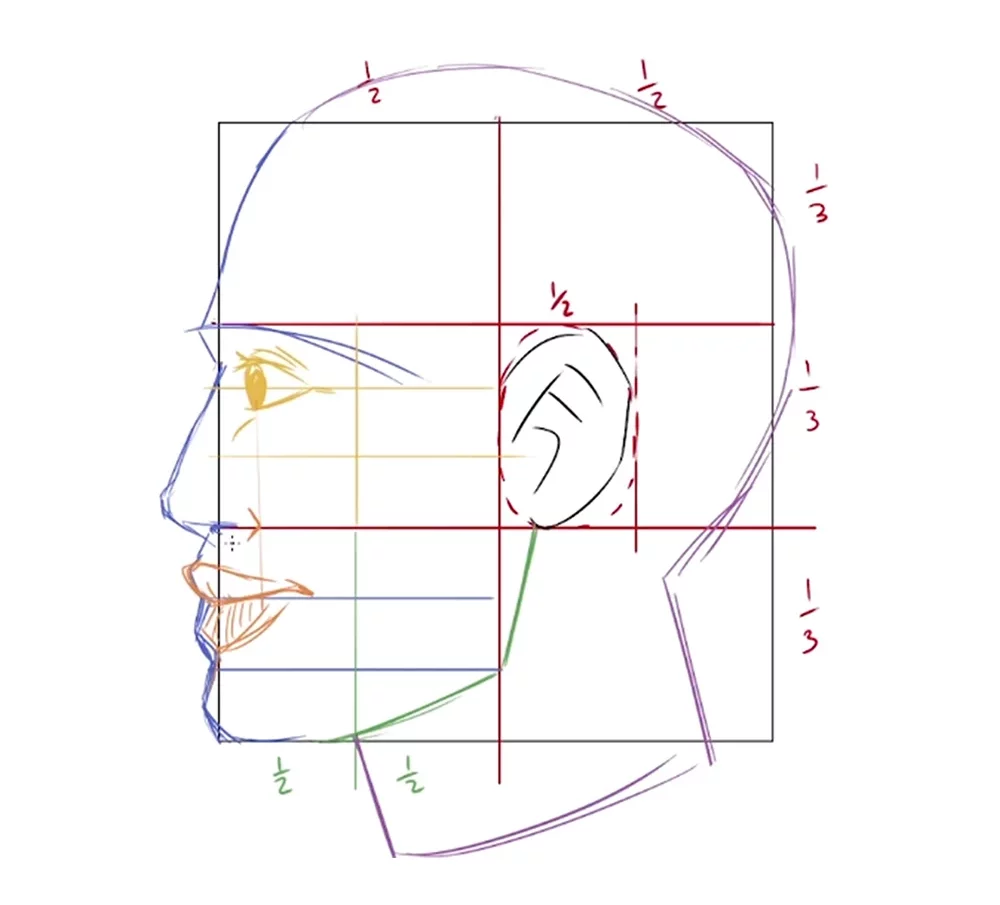
Finally, draw the mouth in the left rectangle of the bottom section. The mouth will be within the top left, and the middle left rectangle of the rectangle as it is drawn in the image above.
The Loomis Method and the Reilly Method are two popular drawing techniques for creating realistic drawings of human faces.
In the Loomis Method, the artist uses a geometric grid to represent the face’s proportions from any angle accurately. The artist then places facial features within the grid to create a realistic portrait.
In the Reilly Method, the focus is on line and shape design and value control. Here, artists use simple shapes to construct a face and refine their drawings by adding mid-tone values.
Both methods have advantages and disadvantages, and it is up to the artist to decide which technique will work best for their own drawing style.
The Loomis Method provides a strong sense of accuracy, while the Reilly Method encourages creativity in shape design. Ultimately, both methods can be used together to create realistic portrait drawings.
The Loomis method is a great place to start for beginners who find drawing heads a bit complicated. It provides a solid foundation for the principles of art.
This method uses the grid, which helps to measure and divide the head into several parts. This allows beginners to practice facial features and proportions before finding their unique method.
Furthermore, the Loomis method focuses on understanding anatomy before starting to draw the features of the face. This technique encourages studying basic form and shape to create believable characters.
The Loomis method is an excellent starting point for anyone who wants to learn how to draw the head from scratch.
21-Draw has an amazing range of online drawing courses for taking your drawing skills to the next level. From beginner to advanced, we have something for everyone. For beginners, “Fundamentals of Drawing” and “Digital Drawing in Procreate for Beginners” are great courses.
For intermediate-level learners, “Mastering Lighting and Shading” and “Environment Design” are great courses.
You can also check our entire collection of online drawing courses.
Happy learning!!
Ryan
Hello! Always interested in learning more about the Loomis Method! What is the best source? I have the book but I think other people interpret it better and I really like what you have done here.
Hi Vicki! If you want to learn about the Loomis Method from a more personable source, I recommend checking out our course "Fundamentals of Drawing." You can find it here: https://www.21-draw.com/course/fundamentals-of-drawing/ Thanks for your support, Rhea
Hi, you haven’t indicated how to determine the diameter of the iris. This feels misleading to me, because it will result in the wrong size of the eye, if I choose this diameter just randomly, won’t it?
ReplyLo descubri por casualidad.Habia comprado un curso online pero no me satisfizo por o que busqué en internet y me gustó este método que sirve para principiantes como para quien está más adelantado. Lo que no encuentro aún son los materiales que debo usar fundamentalmente lápices, esfumines, etc. muchas gracias
ReplyDesde niño fue mi sueño saber dibujar por lo menos bien. Intentaré hacerlo con este método que recién hoy conocí. Talvez logre algo bueno ya que me gusta la geometría. Gracias a todos y saludos desde Argentina.
ReplyWould the Loomis method be geared more so towards realistic drawings or manga aswell? I can see it working for both but I wonder if it's really meant for one.
ReplyError, el metodo loomis no usa cuadricula, yo tengo los 6 libros escritos por este dibujante. Loomis USA LA ESFERA, PARA DIBUJAR LA CABEZA EN CUALQUIER POSICION. El error puede estar en que Loomis usa un cuadrado, pAra la figura de frente y un rectangulo para la cabeza de perfil, SOLO PARA INDICAR LAS PROPORCIONES,LAS FIGURAS SON PLANAS, ES DECIR ALTO Y ANCHO SOLO DOS DIMENCIONES, luego usa la esfera y esas linias, anteriores, son transferidas a la figura en tres dimenciones, que es el metodo final. pueden comprobarlo en los libros, que se descargan gratis en pdf.
ReplyMagnifico, muy bueno para los que estamos aprendiendo esto es de gran ayuda.Muchas gracias por compartir
ReplyThat's not the Loomis method. That's just a grid method.
ReplyEXCELENTE EXPLICACION, ME GUSTA MUCHO LA PINTURA Y ME APACIONA PINTAR RETRATOS. PERO QUIERO APRENDER A DIBUJAR LOS ROSTROS ANTES DE PINTARLOS. ME PARECE UN METODO FACIL DE ENTENDER LO QUE QUEDA ES PRACTICAR.
ReplyExcelente síntesis del proceso de construcción de un rostro bidimensional frontal y y lateral, lo aplícate con mis estudiantes.
Reply Give one for FREE.
Get started
Give one for FREE.
Get started


 Gift Cards