Sale Ends Today! Get annual membership for only $59! You save: $176 ($235).

 Emma Tibbey
Have you ever wondered if you can trace in Procreate? The answer is YES!
If you are interested in drawing, you may be familiar with the concept of ‘tracing.’
Tracing is an important skill that allows you to transfer the line work from a reference image or artwork onto your own canvas. This is significant to many aspects of art and very useful to learn.
Luckily, Procreate makes tracing an accessible technique, allowing you to easily enhance your drawing experience within a few quick but important steps!
If you weren’t already aware of this feature, you might not be familiar with how to trace in Procreate. To make this process easier for you, we have provided a simple guide below on how to start tracing in Procreate.
Additionally, our online course ‘Digital Drawing in Procreate for Beginners‘ also provides some more in-depth and informative lessons on how you can use Procreate to its full potential!
Although auto-tracing is not available in Procreate, the steps to accomplishing this technique are achievable in a seven simple steps.
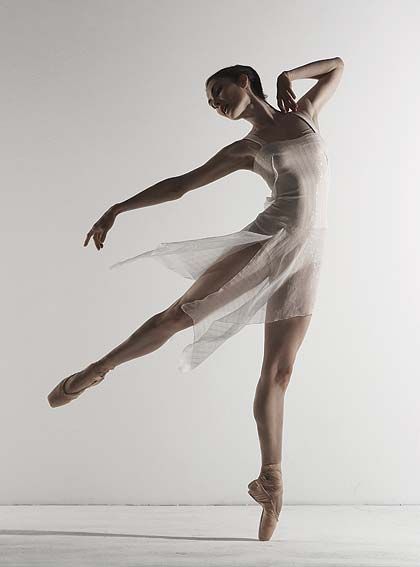
The first step is easy! Choosing your image.
This can be anything you like, whether it’s a reference photo, or your own art (NOT someone else’s).
After you have decided what you want to trace, make sure you have saved that image to a photos app on your device so that you can begin your tracing process.
Opening your canvas. This could be a canvas of an existing piece or a blank canvas, depending on your needs for the project you are working on! If you choose a blank canvas, the background layer can be simply left white so you can start fresh with your own digital art.
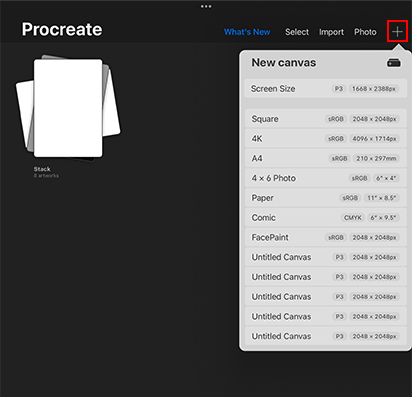
To open a new canvas, simply press the ‘+’ symbol in the upper right corner of your Procreate gallery. This reveals the New Canvas menu. Then select whatever canvas properties you need for your new artwork!
For this step, you will learn how to import your reference photo onto your canvas. In the upper left corner of the Procreate app, you will see a ‘wrench icon’, this is known as the “Actions” tab.
Once selecting the Actions Tab, you can simply press the Add Button in the left corner of the drop-down bar. Finally, select Insert a Photo.
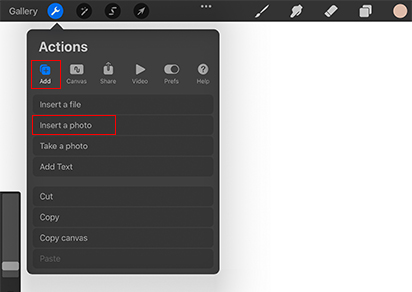
Afterwards, scroll to find your image—whether it’s a recent or an older photo—in your photos library, and then select it in order to import it into your new photo layer.
Once your photo is added, you can then use the Transform Tool by clicking the ‘arrow icon’ in the top toolbar. Then resize or move your image to wherever it is you want it positioned in your artwork!

There are several different ways to transform an image, changing and bending it to suit your needs.
However, if you just require a quick size change, it is most likely best to switch on the Uniform option in the Transform tool settings in order to keep all the image properties the same.
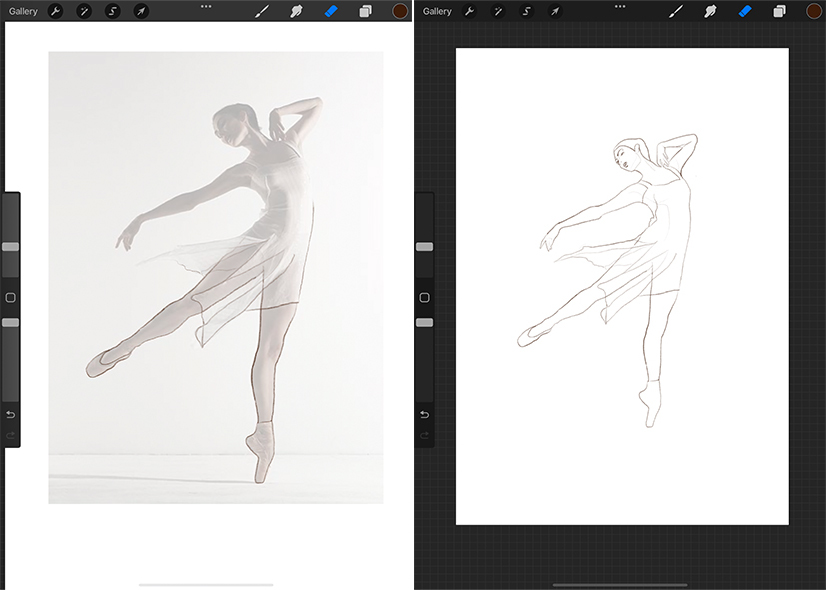
After the reference photo is ready to go, it is time to turn down the opacity of the image. This is done in order to see your lines clearly while tracing over the image.
It is important to make sure that the opacity allows you to easily see the reference image you are tracing, and also the lines you are drawing on top of it.
The first step to achieving this is to open your Layers panel and locate the layer in which your reference image is on. Then select this image layer.
Afterward simply tap ‘N’, or the Normal Blend Mode, located to the right of the image layer. This should reveal the layers settings and allow you to easily change the layers opacity using the ‘slider tool.’
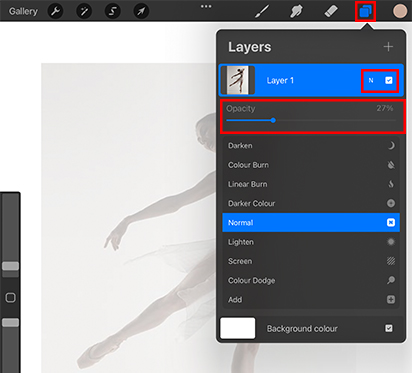
Now you can experiment with different opacities until you find a level that works for you. Somewhere between the 50% and 25% mark on the opacity slider is a good starting point!
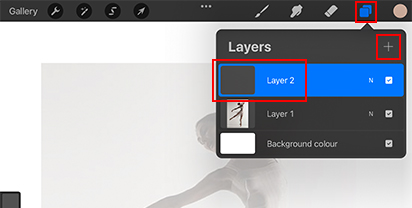
This step is extremely important to remember: setting up a tracing layer.
You MUST make a new layer in order to separate your tracing lines from the reference photo. Without completing this step, your tracing lines will be drawn directly onto your reference image making it impossible to separate the two (and all your hard work will sadly be in vain!)
In order to make sure you avoid this tedious issue, click the ‘layers icon’ in the upper right corner and select the ‘+’ button in order to create a new layer. Make sure that this layer sits above the reference photo on the Layers menu.
Remember to check from time to time that you are always drawing on this new layer as you are tracing.
Once you have done this, all that is left to do is choose your preferred Procreate brush and begin!
When you have finished, don’t forget to switch off the reference image layer to reveal your tracing in its entirety.
Now you know how to trace in Procreate! You can go ahead and experiment, adjusting and drawing whatever additional details you would like in order to create your own unique piece!
Although sometimes it may feel like a shortcut, or like ‘cheating’, it is important to remember the skills and opportunities you can gain from tracing reference photos.
As long as you are not tracing another person’s artwork, or carelessly outlining an image, this technique can help you to really study the different aspects of your reference image.
Tracing can help reveal interesting insight into figure drawing, anatomy, form, lighting, and perspective, as well as countless other important techniques and skills which will help you to build a well-rounded artistic repertoire.
So, now that you know how to trace in Procreate, take your time and allow it to be an educational experience.
For a more detailed look into how to use the basic features of Procreate, you can check out our very helpful, and more in-depth course, ‘Digital Drawing in Procreate for Beginners‘!
If you liked learning how to trace on procreate check out our blog posts on procreate tips and tricks.
Good luck!
Emma Tibbey
Emma is an Australian Freelance Writer, eager to create informative and interesting writing which expresses her creative passions. Emma is currently studying Fine Arts at the Queensland University of Technology.


 Gift Cards