Sale Ends Today! Get annual membership for only $59! You save: $176 ($235).

 Rhea
Rhea
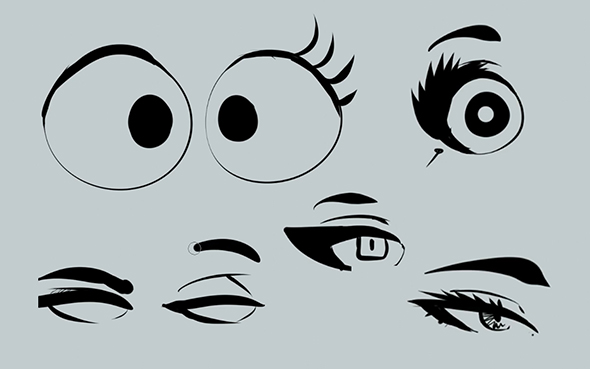
Even though a lot of artists start out with drawing faces, they can sometimes be really hard! Each of our faces is really complex and unique to us.
Have you ever tried to draw a face but the features never end up feeling quite right? Eyes, noses, and mouths can be really difficult when you first start drawing them because they are so complex.
Luckily, there are a few simple methods that will help you learn how to draw facial features easily!
Eyes can seem daunting when you are a beginner artist as they are made up of multiple parts. If you are looking to learn how to draw them, Rodgon does an amazing job of teaching students all about drawing eyes in his course, “How to Bring Your Characters to Life!”

To simplify the process, I like to start by sketching a light outline of the overall shape of the eye. There is a ton of different eye shapes, so do your research and find a reference for the one you want to draw!
Typically, you will want to start with an almond or oval outline for the eye, focusing on using curved lines to create a more natural-looking shape. Don’t forget the pink skin in the inner corners of the eye which is called lacrimal caruncle.
Once you have the shape down, you can add a circle for the iris. Typically the top half of this circle will be obscured slightly by the eyelid. Once you are happy with the size and location of the iris, you can add the eyelid and pupil.
You should also add the waterline to the bottom edge of the eye. Keep these details simple, as you can add more depth later using shading. The shape of the eyelid will be different depending on the person, so again, it’s helpful to use a reference!
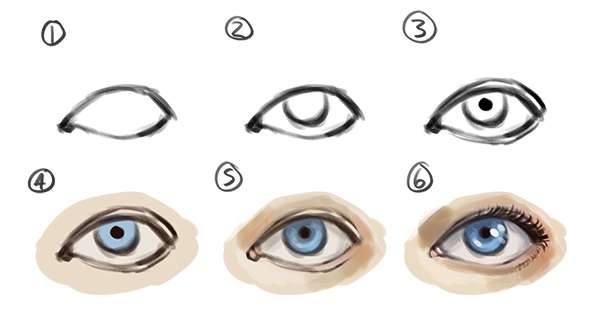
You can then move on to adding color and shading. I recommend setting your line-art layer to a dark brown/red rather than black for this part of the process to keep things looking more natural.
Start off by adding in your base colors, experimenting with skin tones depending on your reference. Then you can move on to your shadows and highlights.
Remember to add shading to the eye sockets as this area is typically in some shadow due to the shape of the human head. During this stage, you can also begin to add in the finer details, like eyebrows, highlights in the inside corners of the eye, defined eyelashes, and color variation to the iris!
Tip: Eyes are spherical, so it is important to add shading to the edges of the eyeball, especially around the top, to show their curved shape. However, this will depend a little bit on your light source.
When it comes to learning how to draw facial features, noses are often overlooked by artists when they are starting out.
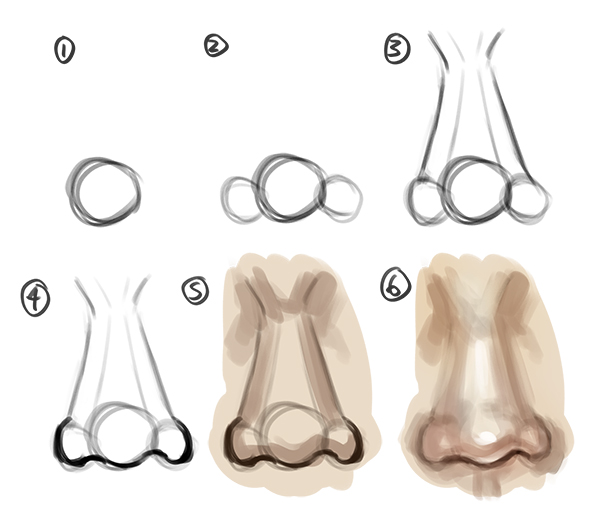
However, they are an important part of the face too! A simple way to draw a nose from the front is to start out with a circle. This circle will act as the foundation of the tip of your nose. Once you have your main circle, add two circles on either side.
It’s totally fine if all your pencil lines are still visible during this stage. Position these circles at the height you want your character’s nostrils to be. You can then add in some light lines for the nose bridge and draw a curved line along the bottom of the nostrils to smooth out their shape.
To shade the nose, I like to start by adding shadows on either side of the nose bridge, using the main two lines as a guide for where to shade.
You can also shade the bottom of the nose and nostril areas. It can help to add some red-toned color variation during this step as our noses tend to have a reddish hue!
Once the shading is complete, try adding highlights to the vertical line of the nose bridge, as well as the tip of your character’s nose to create more dimension.
Tip: Add a small highlight to the bottom of your character’s nose to create a bounce light effect! To learn more about bounce light/reflective lighting check out Aveline’s amazing course “Mastering Lighting and Shading”!
Now there is only one thing our character’s face is missing… Something from the lower half of the face.
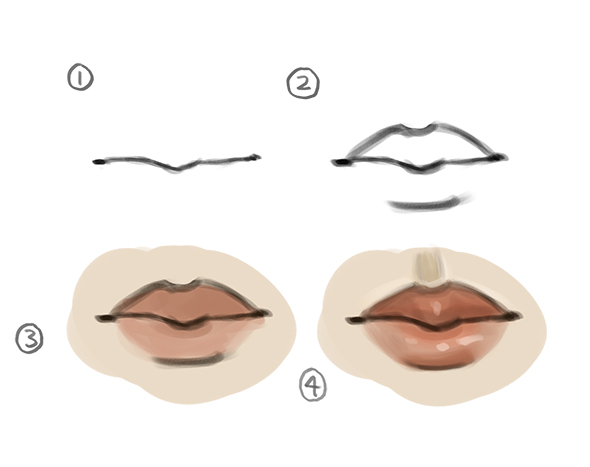
That’s right! The mouth!! It’s imperative to practice drawing lips too! I like to start by sketching the horizontal line halfway between the top and bottom lip to act as a guide for the rest of the mouth. Make the outer edges of the line the darkest.
Once you have this middle line as a guide, you can then draw in the upper lip – just remember to add the cupid’s bow! (Depending on the type of lip you are drawing, of course.) As shown in the above example, for the lower lip, I recommend only drawing a small line to show where the shadow will be. This will help a lot when adding color and shading later!
TIP: When it comes to coloring lips there are a few important things to remember:
I hope these tips have helped inspire you in your portrait drawings! If you want to learn more about how to draw facial features, why not give “How to Bring Your Characters to Life”, our video course by Rodgon, a try?
This course goes into depth about drawing eyes, facial expressions, poses, and everything else you need to know about faces! And guess what? It is perfect for beginner artists! Want to try out a couple of courses? Sign up for our annual membership and get UNLIMITED ACCESS to all our courses for a WHOLE YEAR!!
Rhea
Rhea is an Australian concept artist who is currently studying at Griffith University. She is passionate about spreading her love of art to others.
Thank you! This helped me so so much!I wanted to take a moment to thank you for introducing me to the world of art. Your passion and knowledge about the subject were truly inspiring, and I am so grateful for the opportunity to learn from you. I have been exploring different forms of art and have found so much joy in discovering new artists and styles. It has been a wonderful journey, and I owe it all to you. Your kindness and generosity have made a significant impact on my life, and I cannot thank you enough for sharing your love of art with me. I look forward to continuing to learn and grow in this field with your guidance. Thank you again for everything.
Replyhola SOY ABRIL KAORI TENGO 10 AÑOS QUIERO SER ARTISTA COMO TU
ReplyThank you!!!thank you so much this helped me so much and my drawing are so much better than the last time I love you guys. I love 21-Draw
ReplyThank you!!!thank you so much this helped me so much and my drawing are so much better than the last time I love you guys. I love 21-Draw
Reply


 Gift Cards