Sale Ends Today! Get annual membership for only $59! You save: $176 ($235). 44:44:44

 Rhea Tibbey
Procreate has just released its new animation app ‘Procreate Dreams.’
This app allows artists of all ability levels to animate and create motion graphics on the go! The software has a similar user-friendly, minimalist interface to its popular predecessor ‘Procreate.’
Procreate Dreams is an innovative animation app designed exclusively for iOS devices.
It allows users to seamlessly combine illustration and animation tools – some of which will be familiar to those who have Procreate in the past.
The app provides an innovative approach to animation, allowing users to combine multiple animation styles, including frame-by-frame, motion graphics and even VFX techniques into a single project.
Since it is designed for iOS devices, Procreate Dreams is also one of the first fully fleshed-out apps that will allow animators to work on the go!
Ever wanted to try your hand at animating? This new app might be just what you need to get started!
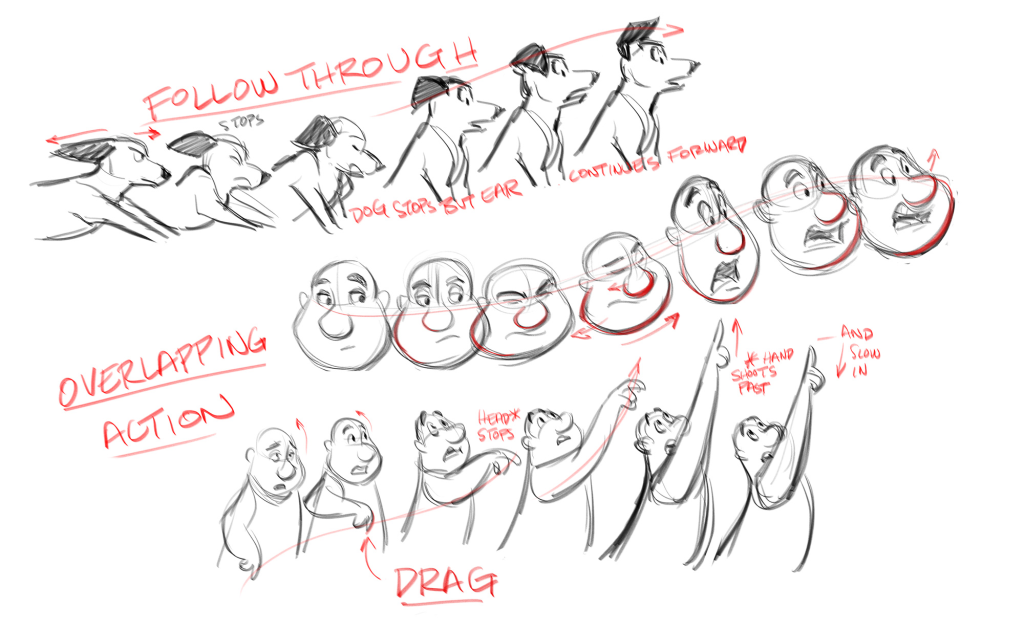
Animation can be tricky to tackle when you are just starting out.
I highly recommend coupling this tutorial with “Introduction to Animation” by Disney animator Tom Bancroft. His PRO video course covers everything you need to start animating
Though Procreate Dreams has a very easy-to-understand UI, like any new program, there is still a bit of a learning curve as you uncover all of the new features.
Don’t worry though! I am going to run you through all the basics you need to know – so that you can get started animating today!

To start things off you are going to want to create a new animation project. To do this first press the ‘+’ icon at the top right-hand side of your screen.
This should open up some ‘movie’ options. If you swipe up or down you will be presented with a range of aspect ratios to choose from. For the purpose of this exercise, I recommend sticking to the default which is the ‘Wide Screen’ option.
To change the quality of your animation, simply tap on the ink ‘4K’ button and choose from the list.
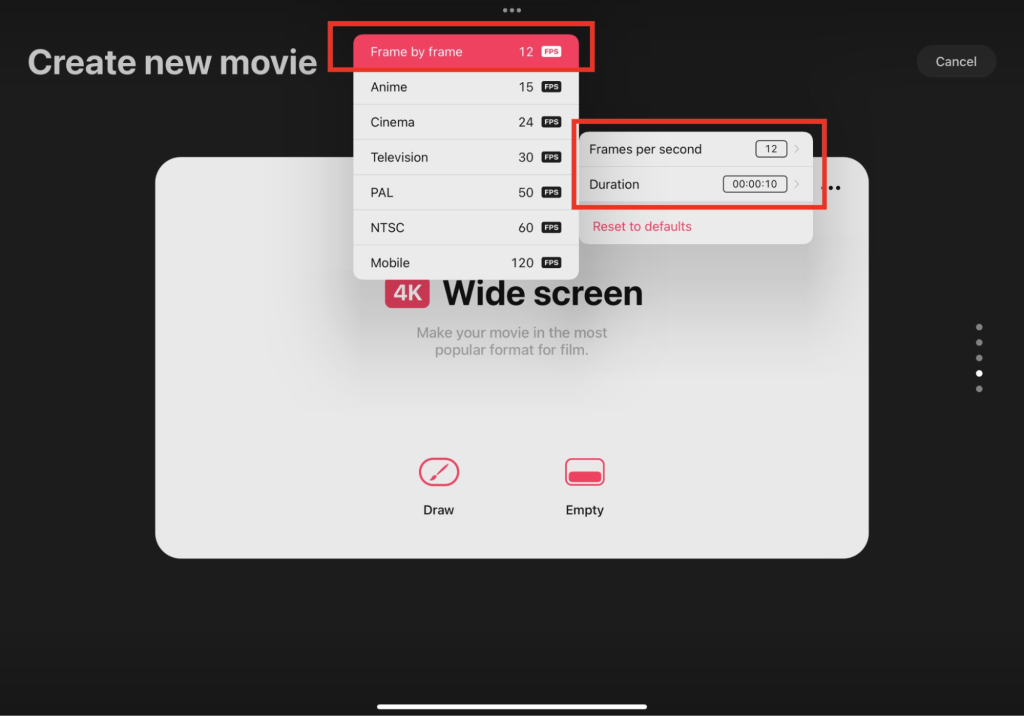
Since we are creating an animation, the standard frame-rate used in film is going to be too high.
To change this, tap on the three dots on the right-hand corner of the project window and select ‘12 FPS (Frame by Frame)’ from the fly-out menu. You will also have the option here to set the duration of your video here. (I selected 10 seconds.)
Once you have made these customisations, you can then create your new project by tapping on the ‘Draw’ option.
Once you have created your project you will almost be ready to start animating.
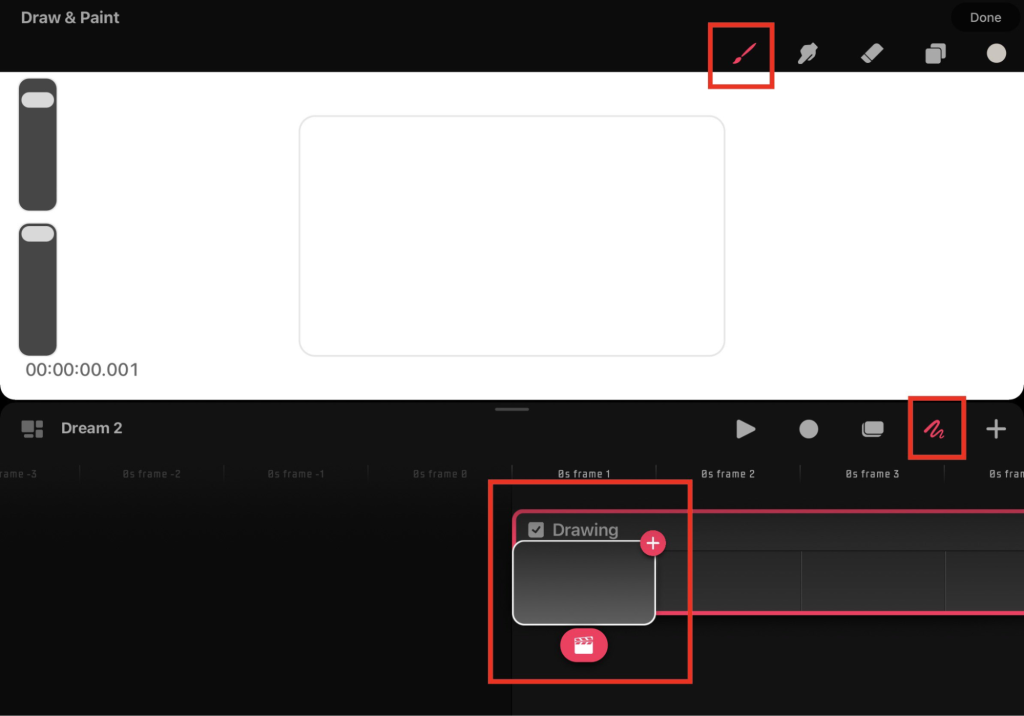
First you will need to make sure you have selected ‘Drawing mode.’ This is the squiggly line to the bottom right of the lower toolbar. Once this is toggled on, the icon should appear pink.
Now that you are in drawing mode you should be able to sketch onto your scene.
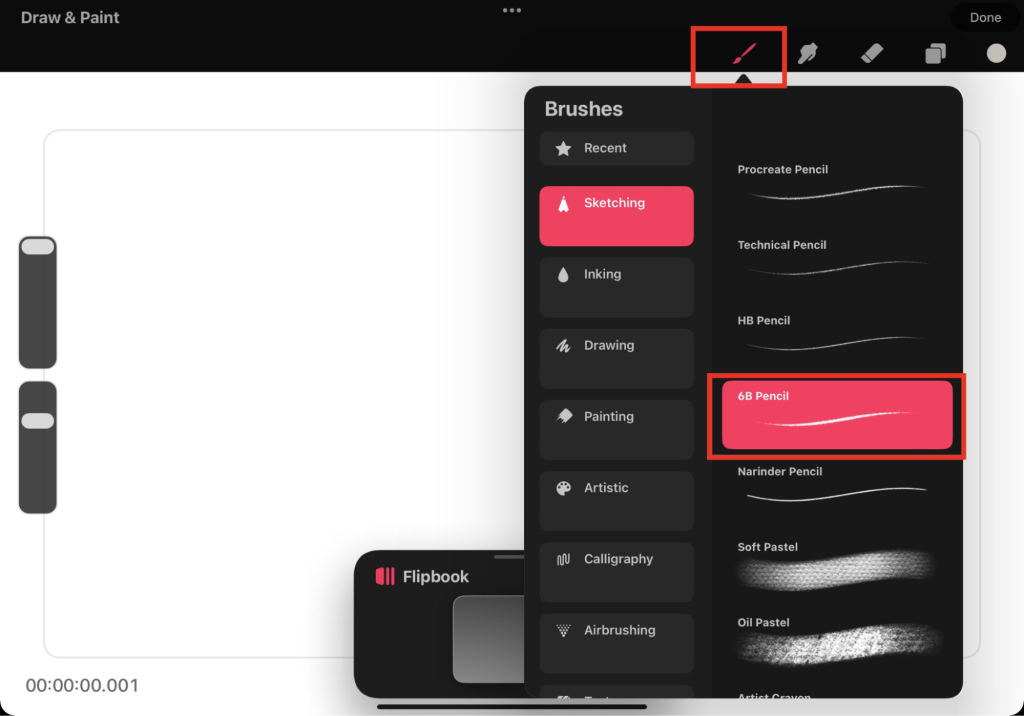
Similar to the Procreate app you will have a bunch of different brushes to choose from and you can find the ‘Brush Library’ under the brush icon on the upper toolbar.
For my initial rough animation sketches I chose the ‘6B Pencil’ from the ‘Sketching’ brush category. I set my brush to black.
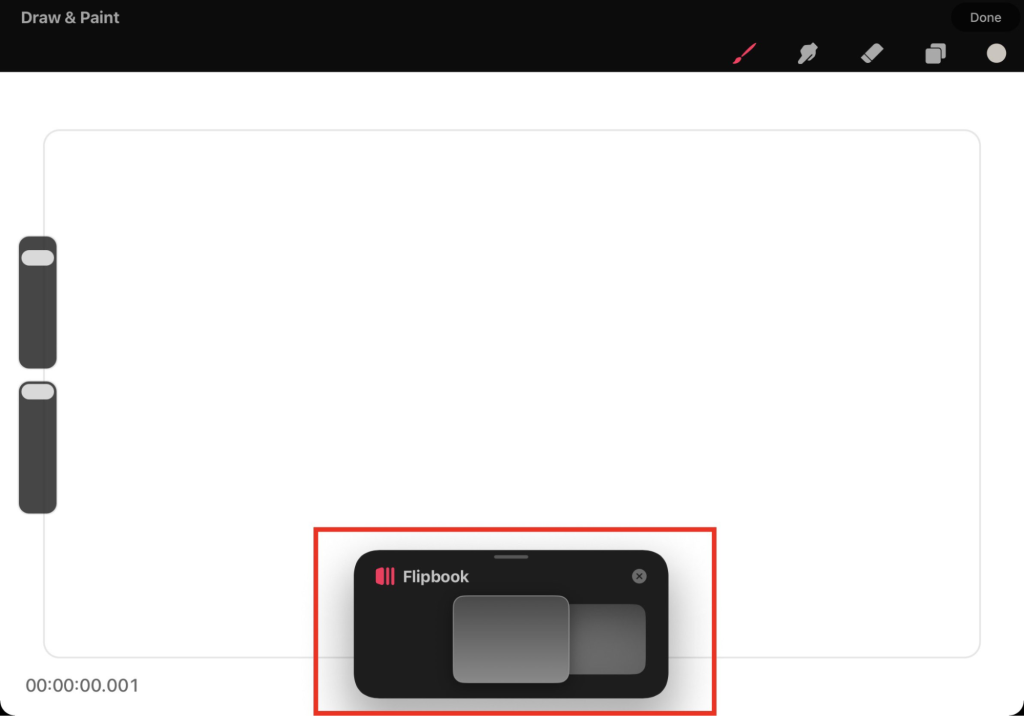
For rough animating I like to have a clear view of my canvas. To reduce this, simply pull down on the light-gray bar at the top of the timeline window.
Your screen should go into ‘flip-book’ mode (as above), showing your frames in a small window.
Now that you have everything set up you can draw the first frame of your animation! I recommend choosing a relatively simple subject to experiment with whilst you are still learning this program.
Check out “Introduction to Animation” taught by Tom Bancroft! His course covers multiple simple animation exercises to grow your skills and create life-like animations.
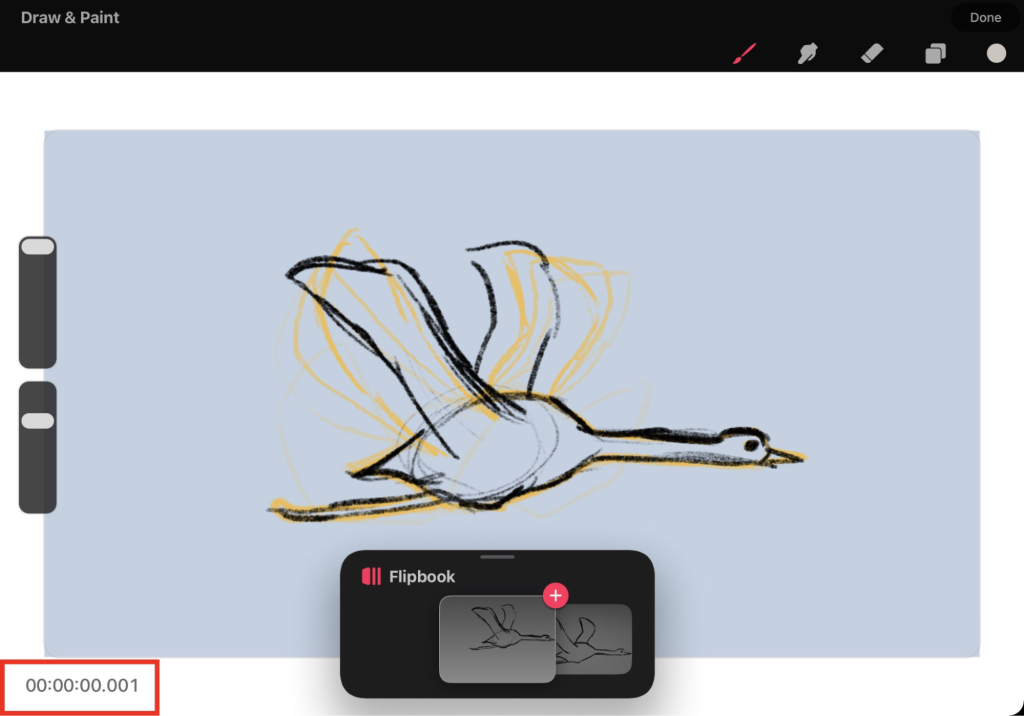
Once you have your first frame drawn in, we can go ahead and add the next frame to your animation.
To do this, tap on the first frame of your animation, you should see a pink + sign pop up. Tap on the + icon and a new frame will be created. You can then select this frame and begin drawing.
You may notice that you can no longer see the previous frame, making it hard to draw your iteration. To solve this issue you can turn on ‘Onion Skin’ by tapping on the timecode to the bottom left-hand side of your screen and selecting it from the menu.
Now your previous frame should be visible in a bright color and lower opacity.
Onion Skin = A technique/ feature that allows an animator to see the previous and/or next frames of their animation to help them make animating decisions.
You can now continue adding new frames and sketching your rough animations.
Adding new tracks to your project
If you decide you want to add clean line-art or even color to your animation you may want to add another track to your project. To do this, we will first need to switch back to the timeline workspace. To do this drag your flip book towards the bottom on your screen.
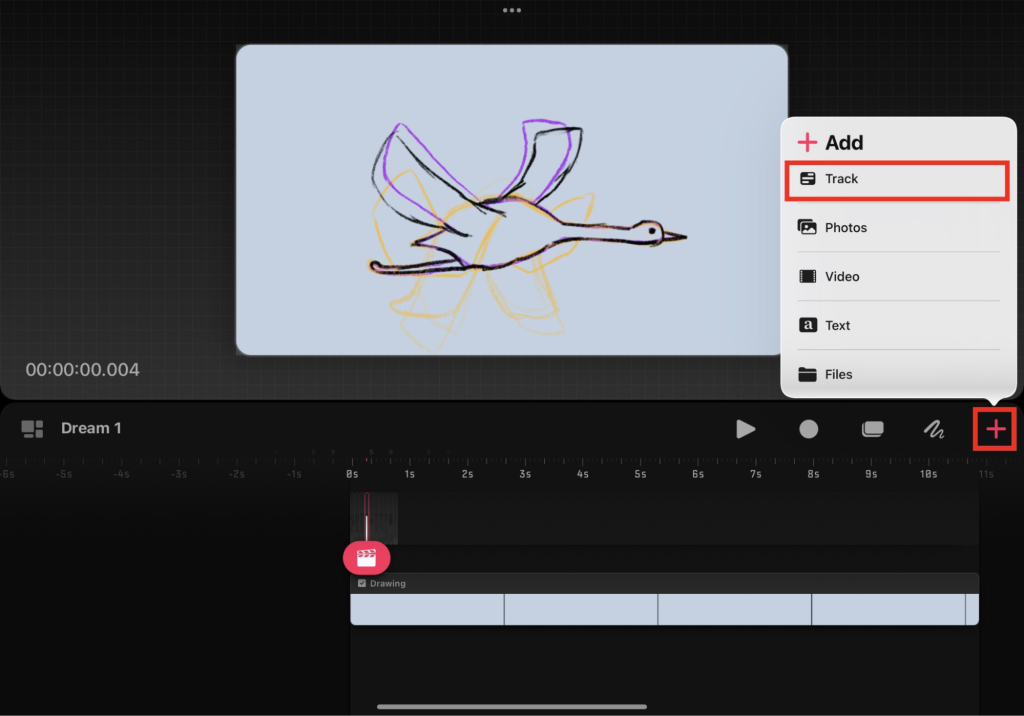
Once you have the timeline up, press on the + icon on the toolbar. This should give you the option to add a new track, video, photo or other file to your timeline.
Select ‘Track’ from the fly-out menu. In drawing mode, you can now begin animating on this new track. Alternatively you can animate on a new layer on your existing frames if you would prefer.
When you are happy with your animation you may want to export it to share with your friends, family and maybe even post it to your social media!
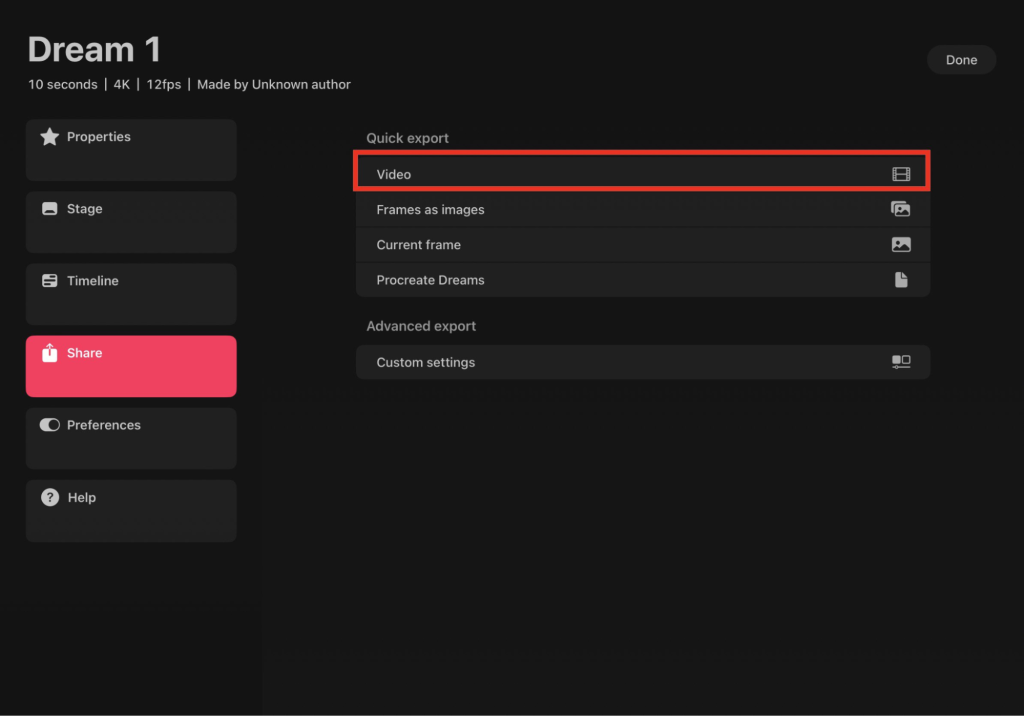
To do this, simply tap on the title of your project and select ‘Share’ from the menu. You should see the option to export your animation as a video or as individual frames. Select video and then save the exported video to your camera roll.
The answer to this question really depends on your personal budget and artistic goals.
With a one-time purchase, priced at around $19.99 USD, the app offers advanced animation features, seamless integration with Procreate, and a user-friendly interface.
For professional animators or those seeking high-quality animation tools on iOS, Procreate dreams is well worth this small investment.
However, if you are looking to try animation for the first time and aren’t sure whether it’s for you, there are more affordable options out there for simple flip-book animations.
When it comes down to it though, Procreate Dreams is really leading the market for animation on iOS, and it is always going to be improving as they continue to update it!
Congratulations! You have just created your first-ever animation in Procreate Dreams!
Ready to take your animating to the next level? Give “Introduction to Animation” a go! Tom Bancroft’s decades of industry experience are hard to beat when it comes to perfecting the key principles of animation and bringing life to your work.
If you are new to drawing our courses on Procreate and digital illustration are a gold mine – you should also check them out.
Rhea Tibbey
Rhea is an Australian artist with a Bachelor of Animation and Art Direction. She is passionate about illustration and has worked as a Producer and Concept Artist on multiple short films! She aspires to spread her love of art to 21 Draw students everywhere!
How do you delete a frame in the middle of a sequence?
Hey! Thanks for reaching out with this question. To delete a frame you should be able to hold down on the individual frame and select "delete" from the fly-out menu. This will leave a gap in your time-line so you will have to move the other frames across to fill it. Hope this helps, Rhea


 Gift Cards