Sale Ends Today! 75% off our annual membership. Get skills that fulfill.

 Rhea
Rhea
Did you know that you can animate in Procreate?
Not only is Procreate awesome for illustration, but it is also great for artists wanting to animate on the go!
Though the popular app doesn’t contain comprehensive animating functionalities, its ‘Animation Assist’ feature provides a really enjoyable experience.
Curious to know how to animate in Procreate?
Here is an awesome Procreate animation tutorial to get you started.
Animation can be tricky when you are just starting out. If you are a beginner, I recommend checking out Disney animator, Tony Bancroft’s, course ‘Introduction to Animation’ as it will teach you all the principles you need to know to get started animating in Procreate!
To set up your canvas for Procreate animation, first open up a Procreate canvas of your chosen size. For reference, the example in this email is using the ‘Screen Size’ option.
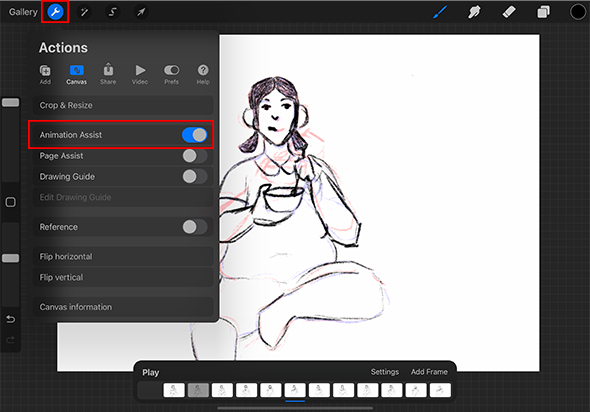
Once you have created your canvas, head over to the ‘Actions’ drop-down menu, which is found under the wrench icon.
A few options down, you will see the ‘Animation Assist’ function. When you turn this on, you should notice a little animation bar appear at the bottom of your canvas which contains a range of Procreate animation tools.
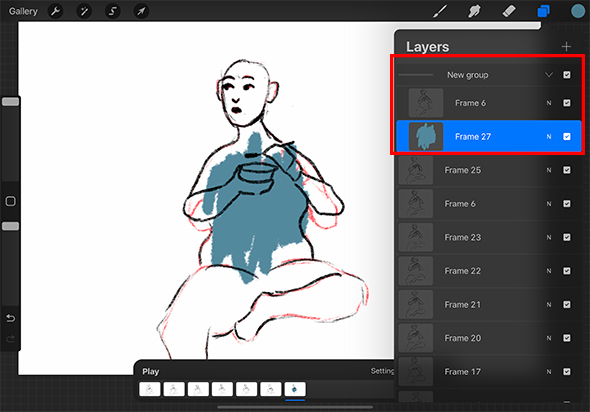
This bar will also display your frames once you start animating. Each frame you create will become a separate layer in your Procreate project.
Now that your canvas is set up, you will be ready to animate! The Procreate animation process is relatively straightforward:
Use the animation bar to add frames to your animation. The animation Settings menu on the bar also allows you to control the speed of your animation measured in fps (frames per second), Onion Skin settings, and whether or not you want your animation to loop! (Your animation loops by default.)
If you aren’t super experienced in animating yet, Onion Skin is the function that allows you to see several of your frames at once, making it easier to keep your Procreate animation consistent.
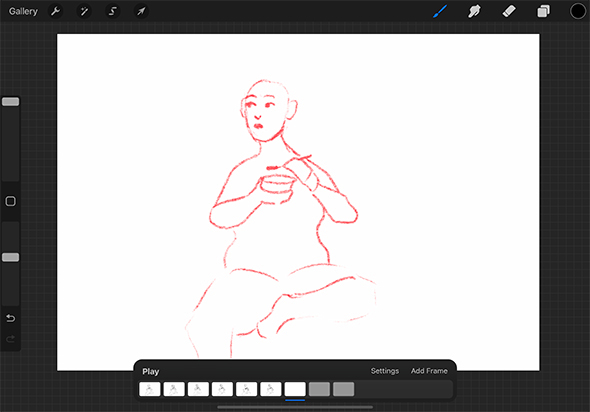
Using this function will help you create a smoother animation. Typically, these Onion Skin frames will be displayed in bright red or blue so that they are easy to distinguish from the frame you are working on.
As you can see below, the Onion Skin is displaying the sketch from the previous frame in red. You can change your Onion Skin opacity and frames in the ‘Settings’ menu.
Pro Tip: Use a low frame rate to play through your keyframes when you are starting your animation. Then change to a higher frame rate, e.g., 24fps, once you move on to in-betweening!
Once you have completed the rough sketches for your Procreate animation, you may want to take it even further and add clean linework and colors.
Doing this in Procreate can be a little tricky, as you will need to group together your sketch, lineart, and color layers for them to all be displayed on the same frame.
To group layers in Procreate, simply create as many layers as you need and then swipe right on each of them in the Layers panel to select. You should then be given the option to create a group.
Another option you have for your Procreate animation is to select a ‘Background Layer’ to choose the color(s) you want to be displayed underneath the entire duration of your animation sequence.
However, this type of layer cannot be changed to match each layer, but will simply remain the same on every frame. This is good for coloring in a static background layer or just adding a simple pop of color to your animation.
(Reminder: Make sure that Animation Assist stays on during the entire animation process.)
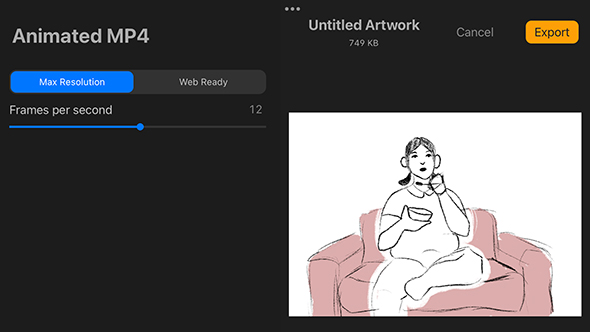
When you are happy with your animation, you can export it by tapping on the wrench icon (Actions Menu) and navigating to the ‘Share’ sub-menu.
You will then be given the option to export your animation as an Animated GIF, Animated PNG, MP4, or Animated HEVC.
Once you select one of these options, you will then be given further settings to choose from, for example, how many frames you want in your final export.
Remember to select ‘Save Video’ when the export is complete to add the animation to your camera roll.
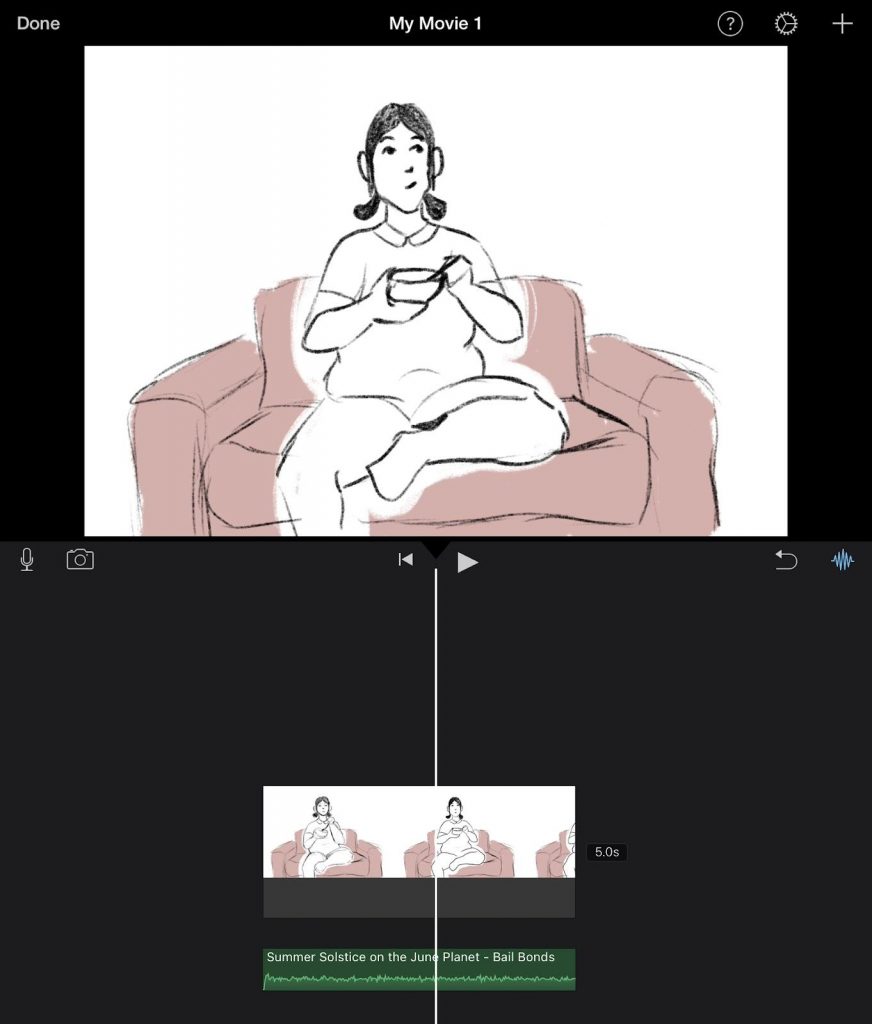
You currently cannot add sound to your videos directly in Procreate. However, once you have finished your animation and exported it, you will be able to use a video editing app, such as Apple’s default iMovie app, to add sound!
To get copyright-free sound, open up Safari or Chrome on your iPad and search for YouTube Studio.
Once you have your studio open, you can navigate to the ‘Audio Library’ on the menu and you will be given a range of songs to choose from. When you have a song downloaded, open it up and select the ‘Share’ option from the top of the screen.
Tap on the iMovie icon. You will then be given the option to create a new movie with your sound. Once the audio is imported, you can now import your video from the Gallery using the plus icon in the top right-hand corner of your screen.
If you want to explore the creative and magical power of animation beyond Procreate, then check out Disney animator Tom Bancroft’s course, ‘Introduction to Animation!’.
So, now that we have tested out animating in Procreate, what’s the verdict? Procreate has a range of pros and cons, any of which may be the deciding factor in whether or not the function is for you! Here are the key ones we think you should know about!
Check the ‘Introduction to Animation’ course to learn the basics of animation. This course teaches you the fundamentals of animation with fun examples like the hopping backpack animation shown below.

So, now that we have broken down the pros and cons of animating in Procreate, that leads us to one final question:
Procreate is great for creating short and simple animations on the go! Though it is not the most extensive animation app out there, its functions get the job done and are easy to use!
Of course, Procreate is not going to become the industry standard for animation anytime soon, as it doesn’t offer all the features needed for polished, professional animations.

Once you get the hang of it, animating in Procreate is a really awesome experience!
The app’s huge range of brushes allows you to experiment with texture in your animation – something you don’t get to enjoy in every animation software.
There is something really unique and exciting about being able to animate with your iPad anywhere! If you are keen to give animating in Procreate a go, check out Disney animator Tom Bancroft’s course, ‘Introduction to Animation!’.
Want to use Procreate like pro? Check out our blog post on Procreate tips and tricks.
Rhea
Rhea is an Australian concept artist who is currently studying at Griffith University. She is passionate about spreading her love of art to others.
Awsome. I love animation and I have been looking for a way to animate for sooooo long. I'm glad I can finally do this, thank you for the tutorial
ReplyI love your entire article! Thank you for the great tips! But I have question. Is there a way to animate two separate objects, both moving at different speeds/frames per second, and keep the animation fluid? Example: a ceiling fan and a dripping faucet in the same scene. Would I need to draw/animate each object at the same time, or is there a way to combine layers? Thank you again.
Hey Brian, Thanks for reaching out with this awesome question! You have brought up a concept in animation that can be quite tricky when you are first starting out. Essentially, for an object to move slowly in an animation, each frame it might only move slightly from where it was in the previous frame. Whereas, when you are animating something fast, like your example of water dripping, it will move a greater distance between each frame. If this is all in the one scene and you are animating digitally, yes you can animate them on separate layers. Let’s say your tap dripping animation only uses up 12 frames, but it takes 24 to animate the ceiling fan doing one full rotation. You can loop the animation of the dripping tap to fill the rest of this time. Let me know if this helps. Wishing you a creative week!
Io sono bloccato a 27 fotogrammi, è possibile averne di più?
Hey Ale! Happy New Year :) This might be due to the length that you have your project set to. If you tap your projects title in the left-hand corner of the time-line you should be able to access your project settings. Let me know if this helps! Best, Rhea
Muchisimas gracias, me estaba poniendo nervioso sobre como animar. :)
Reply


 Gift Cards